Building an electrophysiology setup
Outline
- Introduction
- Equipment and considerations
- Multi-regional recordings
- Overview of technologies
- Closing remarks
Introduction
Extracellular single-unit measures – which are not always available in animals and are rarely possible in humans – provides one of the most direct read-out of neural activity. The extracellular electrode can record ‘single-unit activity’ or ‘spikes’ of several neurons because each recording channel has a sensing range of 65 to 140 μm (Gray, 1995 and Henze, 2000). Electrophysiological methods can measure the activity of individual neurons at high temporal resolution (millisecond scale).
I recommend watching Prof. Kensall D. Wise talk at the University of Michigan. In this talk, Prof. Wise describes the Rocky Road to Neurotechnology from 1966 to 2016.
I am only going to discuss how to use penetrating silicon-based microelectrodes to record extracellular spikes (single units) and local field potentials (LFP). A great review about electroencephalogram (EEG), electrocorticogram (ECoG), LFP and spikes can be found in Buzsaki, 2012 and about state-of-the-art recording and stimulation tools for brain research in Seymour, 2017
Equipment and considerations
To record single units, we will need a microelectrode, a headstage (preamplifier), cable connecting the headstage to a data acquisition system and a recording PC (Fig. 1.). An input/output expander can record peripheral analog and digital devices (like camera TTL, valves opening for delivering water reward, etc.). If you want to read more about the difference between analog and digital signals, you can find a great summary at Sparkfun. Unfortunately, the naming convention is different from company to company (common ‘other names’ are in brackets).
Ground and Reference
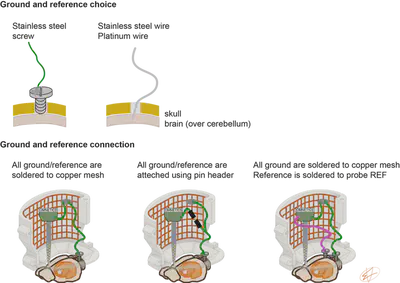
The signal is measured against a reference/ground. The ground can be a stainless-steel screw with a wire soldered to it, or a wire (platinum, stainless-steel). We typically place the ground over cerebellum and secure it in place using dental cement (Fig. 2.). You can watch how to prepare a ground screw and find bill of materials in our Bio-protocol paper. How to secure a ground screw? I think a Hungarian proverb can describe it best: “So many houses, so many customs.” In short, every lab does this differently, so I just show a couple of ones in Fig. 2 that I used in the past.
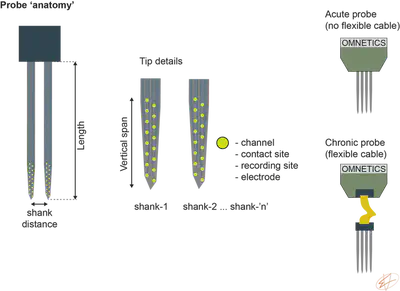
Probe anatomy
Once you have your ref/gnd, you can implant a probe to measure the neuronal activity. But which one? There are so many companies with so many different probes (Cambridge NeuroTech, Diagnostic Biochips, NeuroNexus, Neuropixels, Blackrok Neurotech, etc.). In short, it depends on where you want to record from and what your final analysis will be about. The questions that I would address before ordering a probe:
- Type of recordings: acute / head-fixed acute / freely-moving chronic. Acute probes doesn’t have a flexible cable, chronic ones have. In a chronic animal, you need to decouple the force that you apply to the Omnetics connector from the shanks while plugging in the headstage.
- What is the depth of your brain region? Most probes are 5 mm in length but 10 mm is also available (don’t forget to count the skull and dental cement). This is the Length of the shanks.
- Do you need an angle? In general, it is ’easy’ to insert below 10 degrees. I think beyond 10 degrees, every 5 degrees will make insertion significantly more difficult. The more the shanks are, the more difficult insertion becomes (with a crazy angle some of your shanks will be in the brain while other will be in air, and the ones that are in the brain will always guide the other ones making the insertion challanging).
- What is the 3D structure of your region of interest? As a rule of thumb it is good to have extra shanks to maximize your chances to have at least one shank inside the target region. How many shanks you need?
- Are you interested in more single units or recording the spatial profile of LFP across layers? If you need more cells, try to squeeze in as many recording sites as possible into your brain region. Don’t forget that drift can occur in both acute and chronic recordings. Drift means the physical movement of the brain relative to the probe. Your probe will be deeper than expected in most of the cases after the brain ‘bounces’ back. If you don’t have some extra in dorso-ventral dimensions, then you can be below of your target and ’loose’ all cells.

Figure 3. Probe anatomy
Microdrives
How to hold and move your probe once it is in the brain?
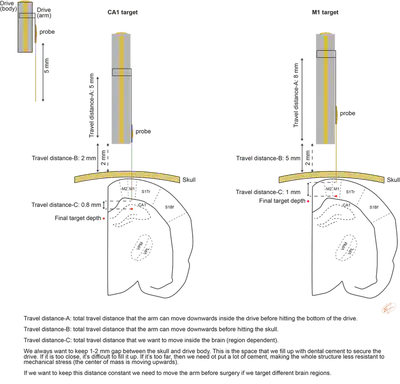
Acute probes can be attached to any commercial manipulators. Chronic probes are typically attached to a mechanical shuttle (called microdrive) that can move the probe in the ‘z-axis’. There are many different microdrives available. An important thing to consider is the travel distance of the microdrive, how much you can move in the brain (Fig. 4.), and weight of the microdrive. 3D-printed plastic drives will be cheaper and lighter than metal ones. We have designed a recoverable, metal microdrive to improve probe reusability.
Multi-regional recordings in a cost effective way
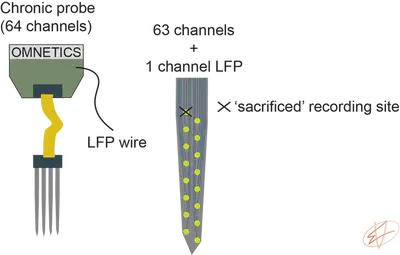
Let’s assume that you want to record LFP from another brain region than your main target. One great solution is to ask probe companies to place wires on your probe. This means that you will loose one recording channel from your silicon probe, but you can use a tungsten wire to record LFP/MUA from another brain region. This way, you don’t need two headstages, you can record easily multiple brain regions. If you have never built a tungsten LFP electrode, check out my how to build a tungsten LFP electrode video tutorial.
Overview of technologies
Recent years showed an amazing increase in available technologies. Increasing the number of recording channels yield more single units per session. Neuropixels 2.0 became commercially available, Sinaps probe provides 1024 channels to record from simultanously. Double-sided probes can increase the single-unit yield because you can ‘see’ neurons on both sides of the shanks. Electronics are miniaturized, cables are getting thinner, commutators are becoming predictive, wireless systems are also being used by more and more labs. Light sources are being integrated on the recording electrodes either as a micro-LED, or using waveguides.
Despite all these new techniques, don’t forget that the Nobel Prize in Physiolgy and Medicine (2014) was awarded for work that was achieved using wires and tetrodes.
Closing remarks
The most important thing to remember is that silicon microelectrodes are fragile. When I am handling probes, I always try to plan my movements in my head, check my surroundings and make sure my hand, tweezer will not bump into anything. Once I make sure that my movement is safe for the probe, then I execute the movement. This seems silly, but the most common thing is that you have a probe under the microscope in the workshop, someone asks you a question, you turn away and when you turn back you realize that your shanks are gone (based on experience).
Having used silicon probes from companies, Neuropixels, Sinaps, micro-LED, I can say that all those are ‘just’ silicon probes. Yes, some of them extremely fancy (and costly), but the main principles how to handle and use them is the same.